


OSRS Vale Totem Fletching Guide 2026: Beginner-friendly | Tons of XP Blog
Complete OSRS Vale Totem guide covering the best methods, gear, routes, and XP rates to train Fletching with vale totems efficiently.
Vale Totem Fletching Guide
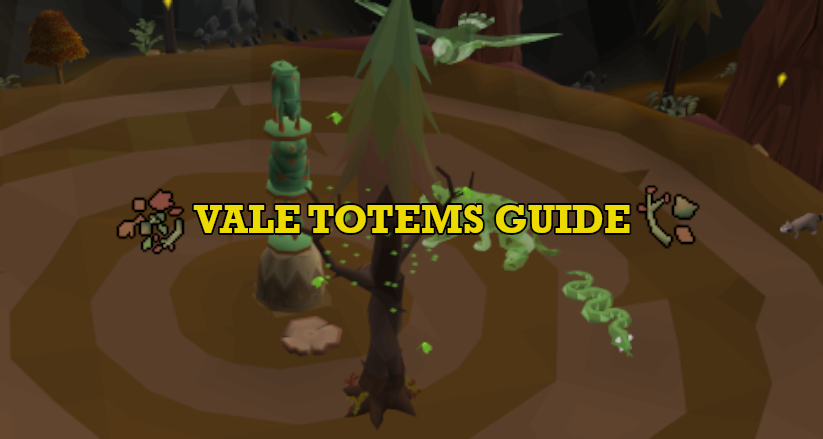
Vale Totem is one of the newest ways to train Fletching, and it's easily one of the best pieces of minigame content Jagex has put out in a while. The concept is straightforward: place totems at various Vale totem sites across the area, earning Fletching XP and the Ents will also reward you for it. What sets it apart from other minigames is how naturally it fits into the world — it never feels boxed off or isolated, and that open, integrated feel is something players have genuinely responded well to.
It's also a solid choice for Ironman, offering better XP per log than traditional methods alongside some worthwhile rewards. In this guide, I'll cover everything you need to know to get started and reach solid XP rates.
Requirements
- Level 20 Fletching
- Completion of the Vale Totems miniquest — Ranulph and Isadora will walk you through building totems and carving depictions of the nearby spirits, effectively teaching you how the minigame works before you dive in.
- Knife — needed to fletch your logs.
- Lots of logs — you'll be going through a fair amount, so stock up. Higher tier logs yield better XP but come with higher Fletching requirements: Oak (20), Willow (35), Maple (50), Yew (65), Magic (80), and Redwood (90).
Recommended
 Log basket from Forestry — not required to play, but essential for getting the best XP rates and rewards on the 8 totem run. It holds 28 logs, letting you complete a full run without a bank trip. You can pick one up from any Forestry shop for 300 noted oak logs, 300 noted willow logs, and 5,000 anima-infused bark.
- Full Graceful and 70 Agility — there's a lot of running involved, but with both of these you won't need to worry about stamina potions at all.
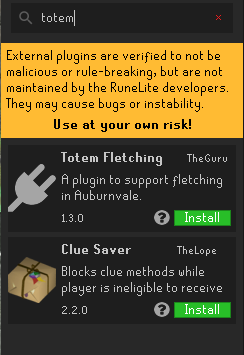
RuneLite Plugin
Totem Fletching Plugin — I highly recommend installing the Totem Fletching plugin from the plugin hub as shown below. It highlights Ent trails so you never miss an XP boost, marks the totem sites, and shows you exactly which spirits are currently present and what to select — making the whole process a lot smoother.
How to Get There
The totem sites are scattered around Auburnvale in the northern part of Varlamore, all close to where the miniquest begins. Here are the quickest ways to get there:
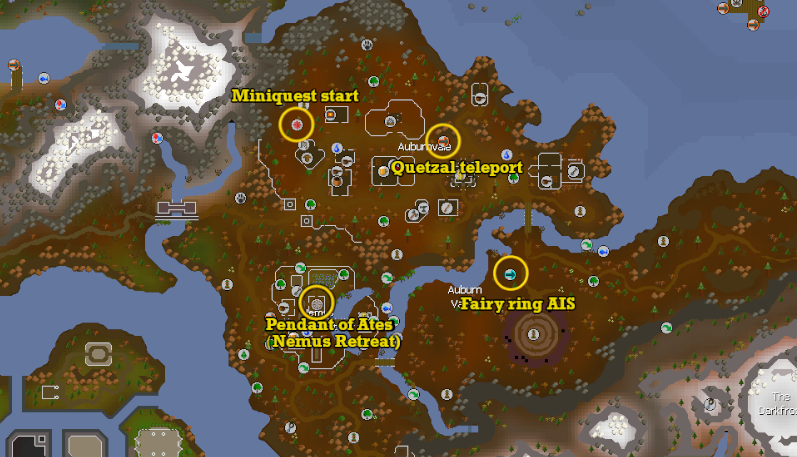
- Quetzal teleport — If you have built a landing spot at Auburnvale, you can use this method to get there. This is the fastest option overall.
- Fairy ring AIS
- Pendant of Ates — teleports you to the Nemus Retreat, but requires completion of The Heart of Darkness. Make sure to activate the statue beforehand or the teleport won't work.
Alternatively, you can run from Civitas illa Fortis. It's a long journey but once you're there you won't need to leave, as there are banks around the area.
Playing Vale Totem
The Basics
Each totem requires 5 logs in total — 1 to build it and 4 fletched into decorations. Decorations are any item fletched from the log used to make the totem. Use your knife on the logs to fletch them; longbows are recommended since they only require one log each.
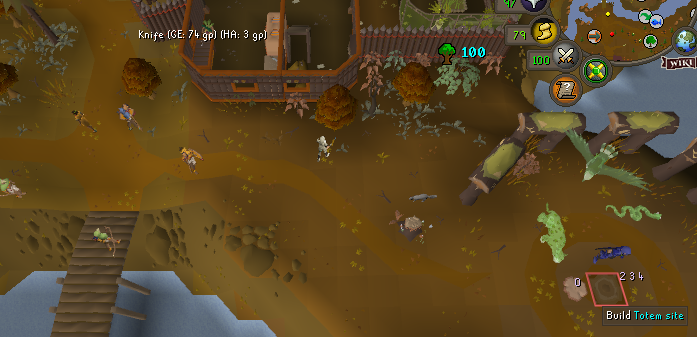
To build a totem, head to any totem site and left-click the spot to build it using one log from your inventory.
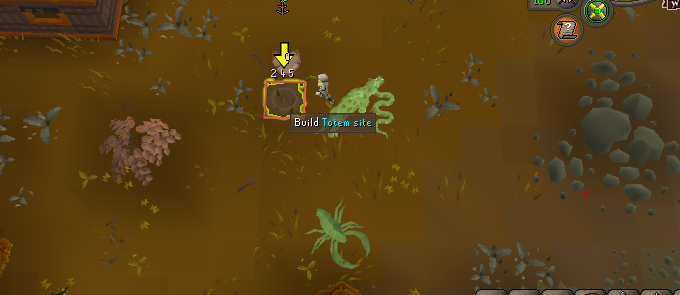
An interface will then appear prompting you to carve the totem three times by selecting the correct spirit animal. There are 5 options, but you should only choose the three animals present around that specific site. When using the Totem Fletching plugin, the correct options will be highlighted — without it, you have to identify the spirits around the area yourself.
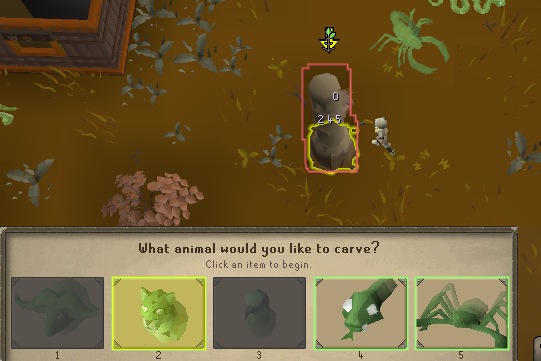
There are five spirits: Buffalo, Eagle, Jaguar, Scorpion and Snake.
Carving it incorrectly results in 25% less XP for your decorations and fewer offerings from the Ents, so pay attention here.
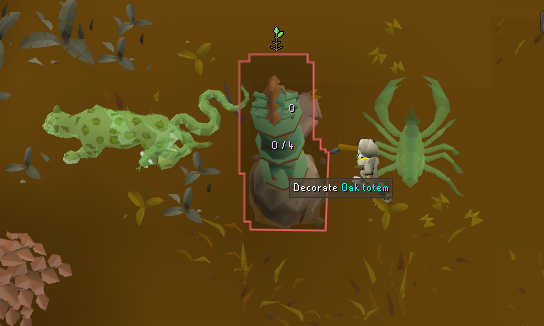
Once carved, decorate the totem by left-clicking it 4 times to place your 4 fletched longbows, earning Fletching XP with each one. After that, the Ents will admire your totem and leave offerings as rewards.
Higher tier logs mean the Ents will admire your totem more times before it breaks, earning you more rewards overall — Redwood totems can be admired several times while Oak totems will only be admired twice.
A couple of things worth noting: building a totem restores 15% run energy, and you don't need to collect offerings as you go. They stack up to 15,000, so feel free to let them accumulate across your run and collect them all at once.
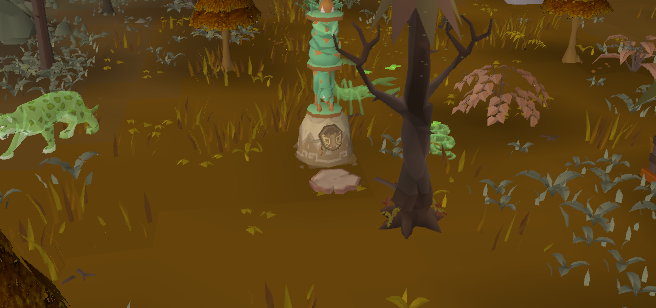
Ent Trails
As Ents walk through the forest, they occasionally leave behind a pair of trails. Stepping on both activates them, granting 15% more Fletching XP for your next 4 totem actions — whether building or carving. The Ent that left the trail will also leave more offerings the next time it admires your totem. Using the Totem Fletching plugin will highlight the Ent trails as shown below.
It won't make a dramatic difference to your overall XP rates, but it's a nice little bonus worth grabbing when the trails are in your path.
Recommended Routes
8 Totem Run
What to Bring
Start at the bank and bring a knife, 26 logs, and the log basket — make sure to fill that with logs too. If you don't have the log basket, bring the Pendant of Ates so you can teleport to the bank mid-run when you need more logs. Without either, there is a bank along the path you can use, though it's the slowest option of the three.
In total, a full run requires 8 logs for building the totems and 32 fletched items of the same log for decorating them.
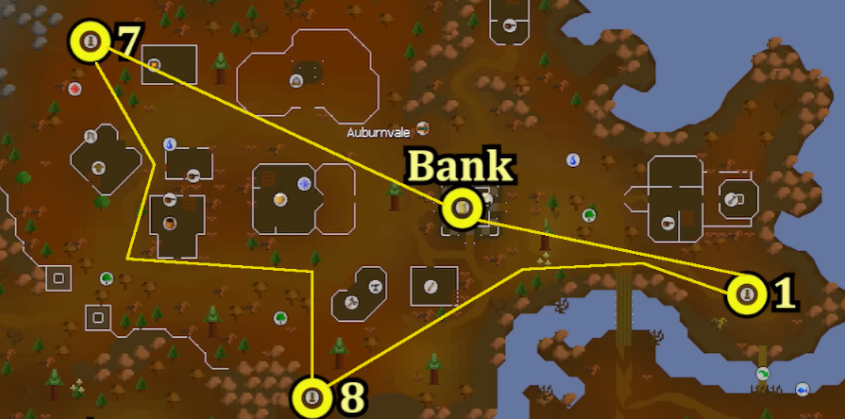
The Route
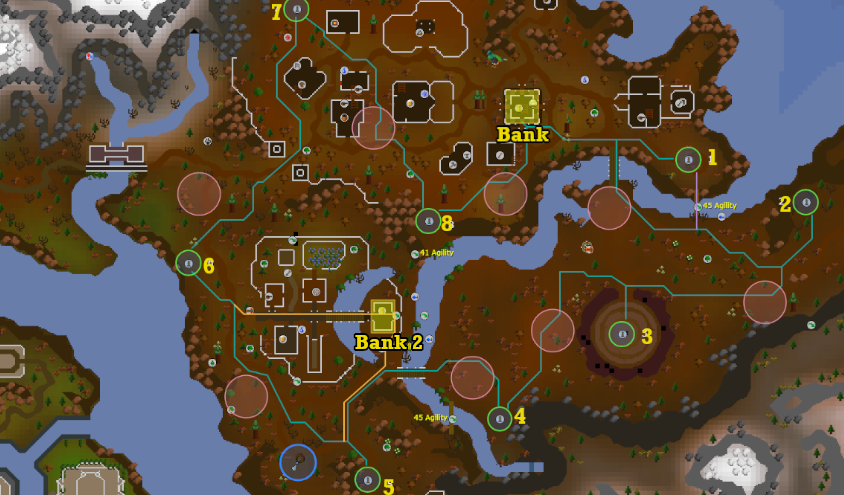
Start at the totem site to the east, marked as 1 in the image above, and work your way clockwise from there, building a totem at each site and stepping over any Ent trails you come across to activate them.
Each totem needs 4 fletched items, so make use of the time spent running between sites to fletch as you go. Just make sure you always keep those 8 building logs aside — accidentally fletching them will mean an unplanned bank trip and a slower run.
Totem 5 — Restocking Logs
By the time you reach totem 5, you'll have run out of logs if you don't have the log basket. At this point, use the Pendant of Ates to teleport to the bank — which conveniently sits close to the next totem anyway. Grab the logs you need and continue from there. Just make sure the statue is activated beforehand or the teleport won't work.
Alternatively, you can take the agility shortcut (requires 25 Agility) as shown above to cut across to the bank instead.
Completing the Run
After the last totem site, run back to the bank and start your next run.
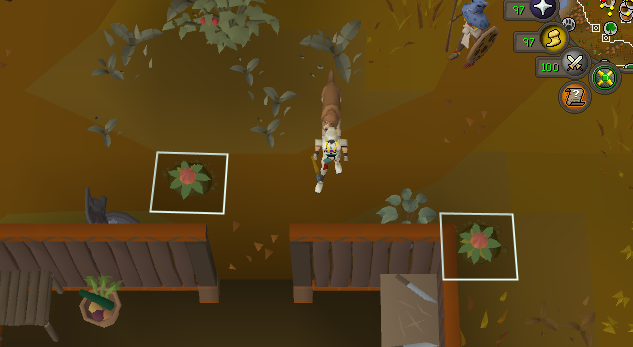
Getting Energy
Ents will occasionally stop to admire a trio of logs and rocks they come across as shown above. If you left-click to admire the same rock or log at the same time as the Ent, you'll receive 20% more run energy.
This isn't something you need to worry about if you have 70 Agility and full Graceful, as you'll have no trouble running between all 8 totems without any energy boost. Lower level players can either keep an eye out for these moments or simply bring stamina potions to make the run more manageable.
Low-Level Guide: 3 Totem Run
As the name suggests, the 3 totem run involves using 3 totem sites instead of the full 8. If you're training with Oak logs, this is the recommended approach since Oak totems break quickly, making it inefficient to trek all the way to all 8 sites. Sticking to 3 keeps your run quicker, giving better XP rates.
With 41+ Agility
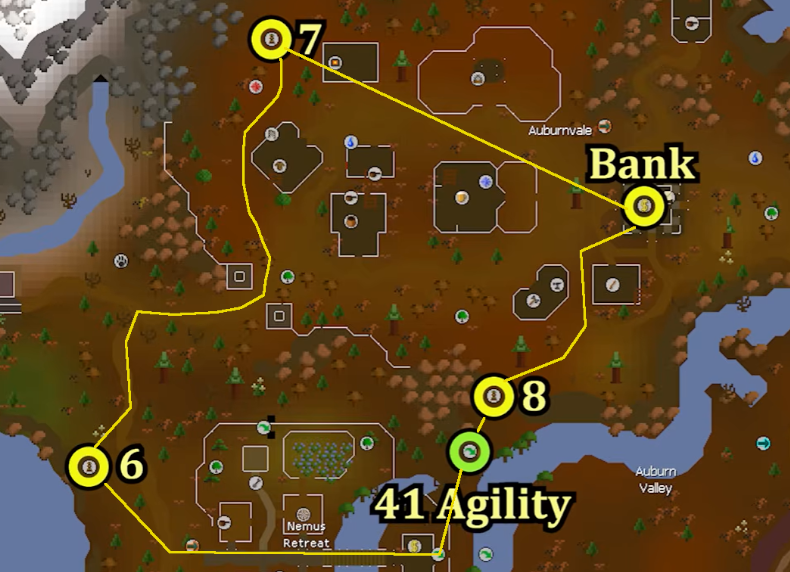
Start at the bank and fill your inventory with Oak logs, fletch 4 Oak longbows then head to totem 8. Build the totem, select the correct spirits, and left-click the totem to decorate it with all 4 longbows. From there, use the agility shortcut and make your way to totem 6, fletching more longbows as you run. Build the totem, then head up to totem 7 and build that one too. Finally, return to the bank and repeat the process.
Without 41 Agility
If you haven't reached 41 Agility yet, the route above is a better alternative as you won't be able to use the shortcut.
Max XP Rates Method: Redwood
Redwood logs offer the best XP rates in the minigame, but the method works a little differently compared to other logs. To run this efficiently, you'll need both the Pendant of Ates and the log basket.
For decorations, you should be fletching Redwood shields. The quicker alternative is the Redwood hiking staff, but it gives a ridiculously low Fletching XP of only 10.5 — making the shield the clear choice despite requiring 2 logs each and being slower.
Because of this, you'll burn through logs faster than usual and will need to restock mid-run even with the log basket, which is where the Pendant of Ates comes in.
One more thing to keep in mind — Redwood shields take longer to fletch than other decorations, so make sure you're staying on top of it between sites and have all 4 shields ready before reaching the next totem. It might seem difficult at the first totem sites but gets easier as you progress.
Done right, this method can reach up to 400,000 XP per hour, making it well worth the extra log cost.
AFK Method: Woodcutting + Fletching
Combining Forestry and Vale Totem
Auburnvale has a variety of great tree spawns close to the totem sites, making it easy to combine Forestry and Vale Totem into one session. This lets you rack up Fletching XP and rewards while simultaneously training Woodcutting — a great way to level both skills together, and especially useful for Ironman who need to source their own logs anyway.
The method is simple: chop 5 logs, fletch 4 of them into longbows or the best decoration available for that log type, build the totem, decorate it, then repeat. Over time you'll work towards unlocking the Fletching knife, which speeds the whole process up considerably.
The biggest advantage here is convenience — there's no running between totem sites, and since you're sourcing your own logs on the spot, you can keep both Fletching and Woodcutting levels roughly in sync without ever needing to visit a bank.
XP Rates
Here are the approximate XP rates you can expect based on the logs you use:
- Oak — 20,000–25,000 XP/hr
- Willow — 40,000–60,000 XP/hr
- Maple — 75,000–95,000 XP/hr
- Yew — 125,000–150,000 XP/hr
- Magic — 245,000–290,000 XP/hr
- Redwood — 300,000–400,000 XP/hr
Rewards from Vale Totem
Left-clicking on your offerings consumes 100 at a time, granting one roll on the drop table and one Vale Research point. The drop table includes roots, bird nests, low to high level seeds, and clue nests. You also have a chance at the following notable rewards:
 Ent Branch (1/20) — can be fletched into Atlatl shafts, making them especially useful for Ironmen looking to stock up on ranged ammo.
 Bow String Spool — holds bow strings that can be used directly from the spool, allowing you to make 27 bows per inventory instead of the usual 14. A spool starts with a capacity of 250 bowstrings, but this scales up to 100,000 as you combine additional spools together.
 Fletching Knife (1/333) — completes fletching one tick quicker and can be wielded in the shield slot. It works with Bruma roots at Wintertodt for faster fletching, and comes in particularly handy during the minigame itself — especially with Redwood shields, where the time saving really adds up.
 Greenman's Mask (1/500) — a cosmetic reward.
Vale Research points can be spent at Ranulph, northwest of Auburnvale, to purchase any of the rewards above. You can also sell items back to him for more points if you'd prefer to go that route.
Conclusion
Vale Totem is accessible for all types of accounts, making it a great option regardless of where you are in the game. If you're at a low Fletching level, training all the way to 99 through this method is definitely one of the most fun and quickest ways to do it — the XP rates are solid at every tier and there's always a method suited to your level and budget.
What really makes it stand out is the atmosphere. The area looks great, the NPCs are full of character, the music fits perfectly, and everything comes together in a way that feels cohesive and alive. It doesn't feel like a minigame you've been shipped off to — it feels like a natural part of the world you're already in, and that makes a bigger difference than you might expect. It's the kind of content that makes training a skill genuinely enjoyable rather than something you just push through to hit a number.
If you'd rather skip the grind entirely, we also offer boosting services to help you hit your goals faster. Click this link to get this service done!