
OSRS Tombs of Amascut Guide 2026 | Tons of XP Blog
Complete OSRS Tombs of Amascut guide covering gear setups, all boss mechanics, puzzle solutions, and strategies for low to mid-level solo players.
OSRS Tombs of Amascut Guide 2026
Tombs of Amascut is one of the best places for players new to raiding to get some practice. It may seem challenging at first, but with enough practice, it really isn't that difficult. The raid supports up to 8 players, and ironmen are eligible for rewards even when completing it with others, though you can solo it if you prefer.
This guide will cover everything you need to get through the raid: the path, the gear, and the mechanics, even if this is your very first raid. With the recent changes, TOA is a lot easier than it used to be. This guide is for high-level to low-level players doing it solo, as you don't need expensive gear or strong PVM skills — basic gear on a low budget is enough, just expect it to be slower.
Requirements
- Beneath Cursed Sands
How to Get There
The Tombs of Amascut are set in Jaltevas Pyramid in Necropolis as shown below:
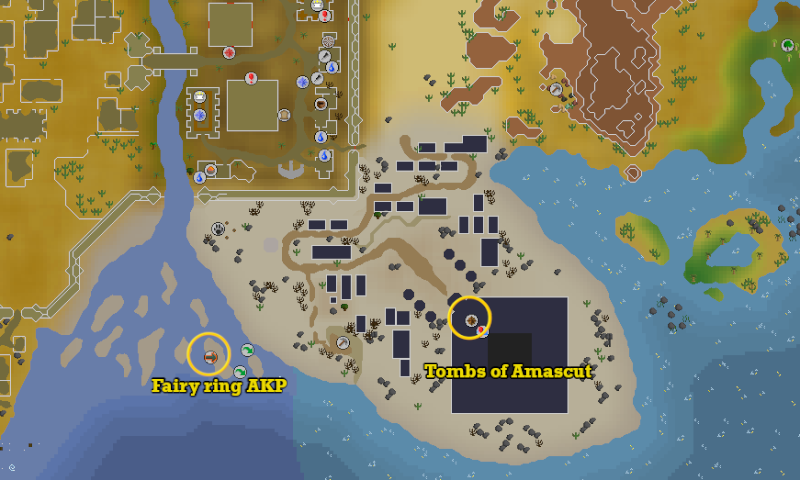
Here are the quickest ways to get there:
- Pharaoh's sceptre — This is the fastest option; it teleports you directly to Jaltevas.
- Fairy ring AKP — Requires 62 Agility to pass the shortcut leading to the pyramid.
- Alternatively, take the magic carpet from Shantay Pass to Pollnivneach, then another from the south side of Pollnivneach to Sophanem and walk south-east. This costs 400 coins normally, 200 after completing the Rogue Trader miniquest, or free after the Desert Hard Diary.
Recommended Stats
I recommnend getting your stats up to atleast these levels before taking on TOA.
- 70+ Attack
- 70+ Strength
- 70+ Defence
- 75+ Hitpoints
- 70+ Ranged
- 70+ Magic
- 77+ Prayer — for Piety, Rigour and Augury
- 41+ Mining — to use a Rune Pickaxe or better
Official Worlds
Here are the worlds designated for the Tombs of Amascut. You can find a team on any of these worlds, especially during peak hours.
- W329
- W331
- W333
- W531
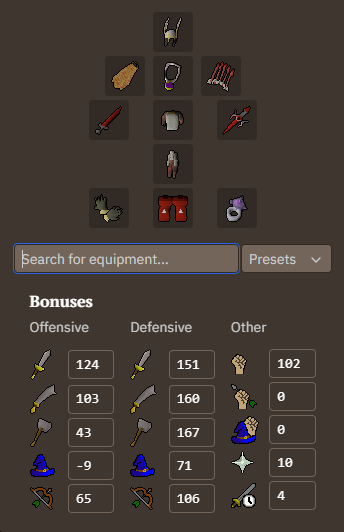
Gear and Inventory Setup
You need all 3 combat styles. Bring your best stab weapon, as most bosses are weak to stab, wear your best melee gear, and bring your magic and ranged gear in your inventory. The Keris Partisan is super useful when facing Akkha so bring it for each run.
Max Gear Setup
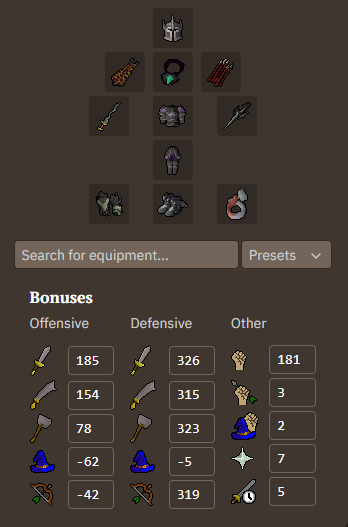
Head slot: Torva full helm
Neck slot: Amulet of Rancour
Cape slot: Infernal Cape
Armour: Torva platebody
Leg slot: Torva platelegs
Weapon slot: Osmumten's fang
Shield slot: Avernic defender
Ammo slot: Dragon arrows (for ranged weapon)
Glove slot: Ferocious gloves
Ring slot: Ultor ring
Boot slot: Avernic treads
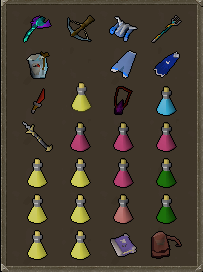
Max Inventory Setup
- Ranged switch: Masori body and legs, Zaryte crossbow, Twisted bow, Toxic blowpipe, Necklace of anguish, Dizana's quiver
- Magic switch: Ancestral hat, Ancestral robe top, Ancestral robe bottom, Lightbearer, Occult necklace, Tumeken's shadow, Tormented bracelet, Imbued god cape
- Sanfew serums
- Divine super combat potions
- Book of the Dead
- Divine rune pouch
For high-level gear, since you need fewer brews, bring designated gear for each combat style.
Mid-Level Gear Setup
Head slot: Serpentine helm
Neck slot: Amulet of torture
Cape slot: Fire cape
Weapon slot: Zamorakian hasta
Armour: Eclipse moon chestplate
Leg slot: Eclipse moon tassets
Shield slot: Dragon defender
Ammo slot: Ruby dragon bolts (e)
Glove slot: Barrows gloves
Boot slot: Dragon boots
Ring slot: Lightbearer
Mid-Level Inventory Setup
- Ranged switch: Toxic blowpipe, Ava's assembler, Necklace of anguish
- Magic switch: Bloodbark top, Bloodbark legs, Occult necklace, Trident of the Seas
- Keris partisan
- Book of the Dead
- Dragon crossbow
- Potions: Saradomin brew, super restore, Divine combat potion
- Special attack weapon: Dragon dagger
- Saradomin brews
- Divine rune pouch
- Food: Sharks or similar
For mid-level players, use Eclipse Moon Armour for both ranged and melee to minimize switches and free up inventory space for more brews.
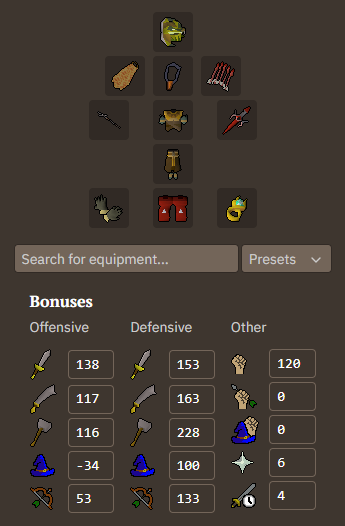
Low-Level Gear Setup
Head slot: Helm of Neitiznot
Neck slot: Amulet of glory
Cape slot: Fire cape
Weapon slot: Dragon sword
Armour: Mixed hide top
Leg slot: Mixed hide legs
Shield slot: Dragon defender
Ammo slot: Ruby bolts (e)
Glove slot: Barrows gloves
Boot slot: Dragon boots
Ring slot: Ring of shadows
Low-Level Inventory Setup
- Ranged switch: Toxic blowpipe, Rune crossbow, Ava's assembler
- Magic switch: Mystic robe top, Mystic robe bottom, Occult necklace, Imbued god cape, Trident of the Seas
- Keris partisan
- Book of the Dead
- Dragon crossbow
- Potions: Saradomin brew, super restore, Divine combat potion, and Divine ranging potion
- Special attack weapon: Dragon dagger
- Saradomin brews
- Super restores
- Rune pouch
- Food: Sharks or similar
Since you need more brews with low-level gear, use Mixed Hide armour for both melee and ranged and bring Mystics for magic.
Invocations
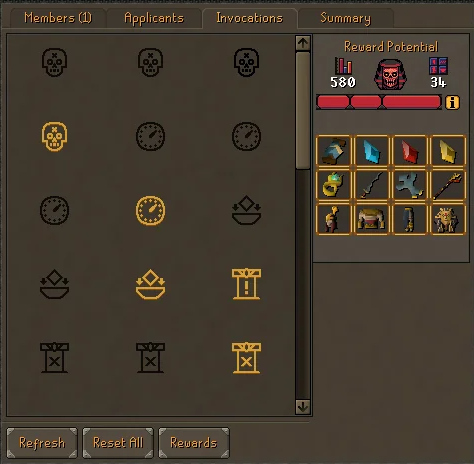
There are 44 invocations, and each one increases the difficulty of the raid as well as your loot potential. They affect how many times you can die before the raid fails, how much time you have to complete a raid, how many supplies are available during the raid and they can also increase boss difficulty, change their prayers and special attacks, and much more.
Once you're comfortable clearing the raid consistently without invocations, you can start adding invocations for more points and better loot. Add them gradually as you get more confident.
Entry Level — 50 Points
These don't change the raid too drastically but read through so nothing catches you off guard.
- Lively Larvae (+5) — The number of dark eggs launched during Kephri's Mass Incubation increases from 2 to 4.
- Blowing Mud (+10) — Increases the number of people hit by Kephri's Dung Strike to two. No effect in solo so it's free points.
- Not Just a Head (+15) — Zebak will occasionally cast Blood Blitz on you, either hitting for 8–11 damage or summoning a Blood Cloud that chases and damages you on contact.
- Shaking Things (+10) — Ba-Ba's slam shockwave increases from a 3x3 to a 5x5 area.
- Overclocked 1 (+10) — During the Wardens' final phase the slam attack comes 1 tick faster.
Entry Level — 100 Points
Once you're getting consistent clears you can start adding death invocations to the once above.
- Persistence (+10)— You have five attempts to complete the raid.
- Arterial Spray (+10) — Zebak's blood magic has increased range and healing. Requires Not Just a Head
- Gotta Have Faith (+10)— Energy blasts from open sarcophagi in Ba-Ba's room deal extra damage based on your remaining prayer points.
- Acceleration (+10)— During Wardens phase 2 the Warden attacks faster while the Obelisk charges faster.
- Overclocked 2 (+10) — Slam attack comes 2 ticks faster during the Wardens' final phase. Requires Overclocked 1
Normal — 150 Points
Once you're even more confident you can start to add these as well.
- Softcore Run (+15) — You have three attempts to complete the raid.
- Deadly Pray (+20) — Your prayer is drained by 20% of damage taken.
- On a Diet (+15) — You can no longer eat food inside the raid, only potions. Silk Dressings and Honey Locusts will no longer be offered by the Helpful Spirit.
Normal - 250
- Walk the Path (+50) — Randomly increases the difficulty of each path as you progress. A big point booster but can make things harder, so add this when you're comfortable.
- Jungle Japes (+5) — Ba-Ba's Baboons drop a banana peel when killed. Standing on one stuns you for 3 seconds and deals a small amount of damage.
- Mind the Gap (+10) — At 66% and 33% health when Ba-Ba knocks you back, standing in the middle of the room will send you into the pit and kill you instantly. Stay on the north or south sides to avoid this.
- Feeling Special (+20) — Akkha's special attacks become harder. The Memory Blast gives you less time to move, Trailing Orbs spawns an extra orb, and the Detonate attack hits in more directions.
- Blood thinners (+5) - Three Blood Clouds are summoned instead of one when facing Zebak. This invocation requires Not Just a Head to be active before it can be enabled.
- Ancient Haste (+10) — The Wardens charge faster during phase 1.
There are more invocations all the way up to expert level - 500 but try these first and work your way up as you improve.
Tomb of Amascut Plugin
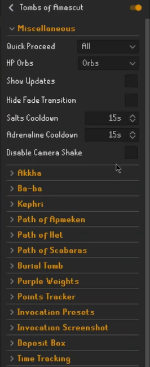
I highly recommend downloading the Tombs of Amascut plugin from the Plugin Hub. Here are the most useful features it offers:
- Baboon Outline — Highlights each baboon type in a different colour so you can identify them instantly
- Volatile Baboon Radius — Highlights the explosion area around each Volatile Baboon
- Beam Timer — Shows a timer on the Caster statue so you know exactly when to click the Het Seal for an extra hit
- Mirror Puzzle Solver — Shows exactly where to place each mirror to direct the light beam
- Puzzle Helpers — Highlights the solution for every puzzle automatically
- Swarmer — Displays wave numbers on Scarab swarms as they spawn during the Kephri fight
- Points Tracker — Tracks your raid points earned which directly affects your loot
Keris Partisan of the sun
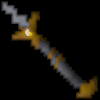
The Keris Partisan of the Sun is a one-handed spear that requires 80 Attack to equip. It’s created by attaching the Jewel of the Sun (a drop from tombs of Amascut) to the Keris Partisan, unlocking a special attack and two powerful passive effects that only work inside the Tombs of Amascut:
- 25% increased accuracy against targets below 25% health
- Heals you for 12 Hitpoints when you kill an enemy, costing 5 Prayer points — this can overheal up to +12 HP above your base level
This weapon allows you to heal up throughout the boss fights in the Tombs of Amascut and even with the Wardens. You can heal off Monkey Room thralls, Kephri eggs and swarms, Warden skulls, and more, making it much easier to stay alive—especially when you make a mistake.
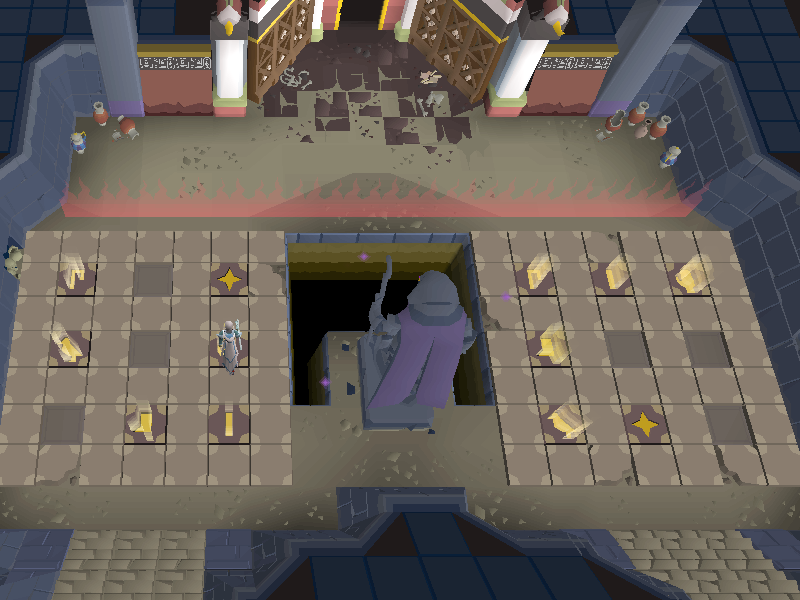
Nexus

Once you enter the pyramid, you'll be in the Nexus — use the bank there to get ready. Each portal leads to a puzzle room, which you must complete before reaching the boss, and you can tackle them in any order you prefer.
After clearing 2 paths, a Helpful Spirit will appear and offer three bundles of raid supplies to choose from.
- Life — Supportive bundle containing Nectar, Tears of Elidinis, Silk Dressings, Blessed Crystal Scarabs, and Ambrosia
- Chaos — Mixed bundle containing a random selection of Nectar, Tears of Elidinis, Smelling Salts, Ambrosia, and Liquid Adrenaline. Quantities vary, so contents are never the same
- Power — High burst bundle containing 2 Smelling Salts and 1 Liquid Adrenaline
Here is what these items do:
 Honey Locust — Heals 20 HP (can overheal) and restores prayer equal to a prayer potion dose. Stacks in inventory. Automatically given during wipes unless "On a Diet" is enabled
.png) Ambrosia — 2 doses. Fully restores HP, prayer, and run energy, acts as an antidote++, and boosts HP and prayer based on your base level
Ambrosia — 2 doses. Fully restores HP, prayer, and run energy, acts as an antidote++, and boosts HP and prayer based on your base level.png) Blessed Crystal Scarab — 2 uses. Restores 72 prayer points total over 24 seconds
Blessed Crystal Scarab — 2 uses. Restores 72 prayer points total over 24 seconds.png) Liquid Adrenaline — 2 doses. Halves special attack costs for 150 seconds
Liquid Adrenaline — 2 doses. Halves special attack costs for 150 seconds.png) Nectar — 4 doses. Heals HP (can overheal) but drains your combat stats
Nectar — 4 doses. Heals HP (can overheal) but drains your combat stats.png) Silk Dressing — 2 uses. Heals 100 HP total over 60 seconds. Not given if "On a Diet" is enabled
Silk Dressing — 2 uses. Heals 100 HP total over 60 seconds. Not given if "On a Diet" is enabled.png) Smelling Salts — 2 uses. Restores 25% run energy and boosts all combat stats. Refreshes every 15 seconds for 8 minutes
Smelling Salts — 2 uses. Restores 25% run energy and boosts all combat stats. Refreshes every 15 seconds for 8 minutes.png) Tears of Elidinis — 4 doses. Restores combat stats and prayer in a 3x3 area, affecting nearby party members
Tears of Elidinis — 4 doses. Restores combat stats and prayer in a 3x3 area, affecting nearby party members
A Deposit Pot is also nearby to clear up inventory space if needed; it works like a normal bank deposit box.
Starting Out
When learning the raid I recommend doing Zebak first, then Kephri, Akkha and Ba-Ba. This helps you avoid sudden deaths late into the raid.
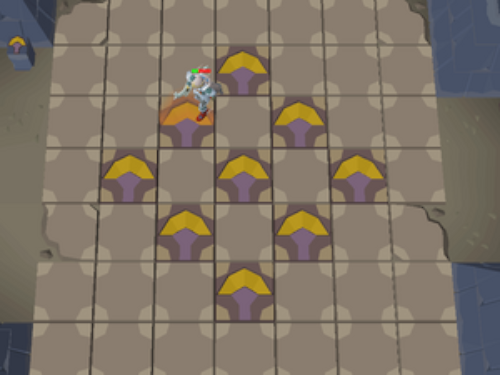
Path of Crondis
This is the easiest puzzle room of all. Pick up the water container from the floor, then collect water from the waterfalls and use it on the Palm of Resourcefulness at the centre until its health is full.

To avoid the obstacles, follow the marked tiles in the image above — left-click the waterfall to fill up, follow the path back to avoid damage then use it on the palm at the center. Repeat this for the remaining waterfalls on both sides. There are 4 in total.
You can fill the Palm in as little as 2 runs but if you take too long its health will drop, forcing you to do more runs. Getting hit by any obstacle reduces the water you're carrying so avoid them. Some crocodiles may also spawn in the arena — just freeze them and continue your route.
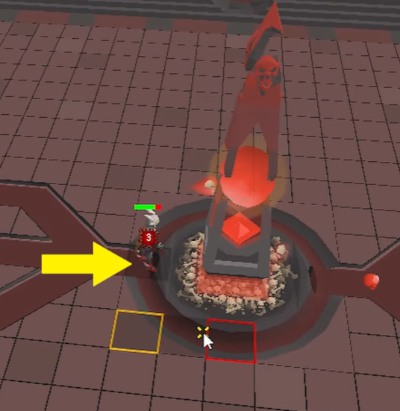
Zebak, Guardian of Crondis
This is the easiest boss in the raid. Equip your ranged gear and crossbow since it is weak to ranged, then head in and start attacking.
- For his jugs, pray Protect from Magic
- For his rocks, pray Protect from Ranged
When he reaches 85%, 70%, 55%, and 40% health, he will use one of these 2 special attacks:
- Tidal Waves — Zebak spawns jugs and poison on the floor before sending waves across the arena. Avoid the jugs and poison while dodging the waves. You can attack the jugs to clear a path.
- Roar — Zebak will shoot out jugs, poison, and 2–3 rocks first, then let out a roar. Hide behind the rocks to avoid taking damage.
The poison pools will remain in the arena. Avoid them throughout the fight and switch your protection prayer accordingly when you see his magic or ranged attacks. Once he's down, click Proceed to return to the lobby.
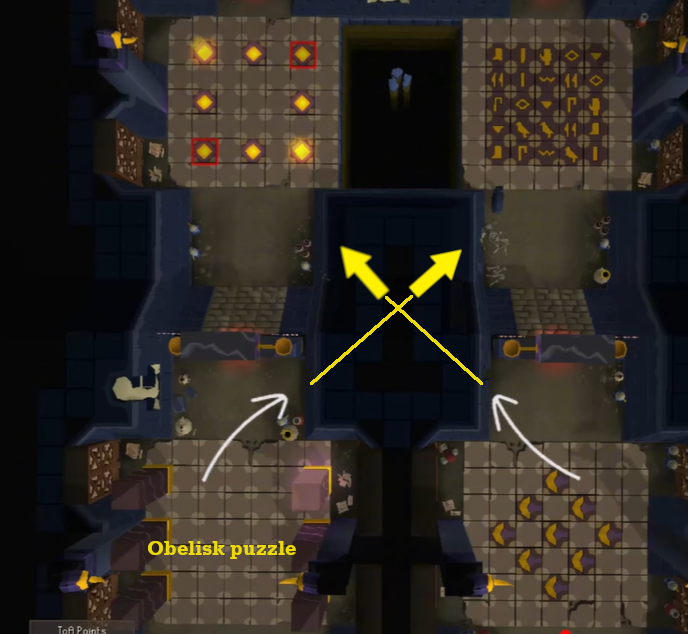
Path of Scabaras
For this path you get to choose which of the 2 puzzles you want to do. I recommend avoiding the one with the Obelisk as it takes the longest time to finish. The second part of any puzzle will be the one diagonal to it as shown below, so pick wisely. After you finish the first puzzle, enter the crevice shown below to get to the next puzzle diagonal to it.
Some Scarabas will spawn during the puzzle and attack you — they deal some damage but you can ignore them to save time.
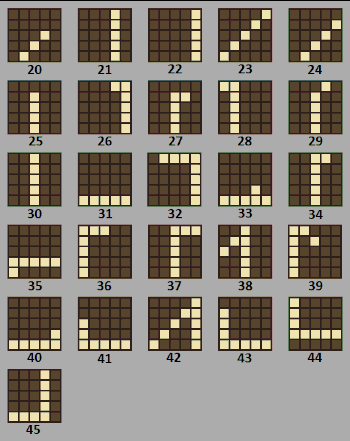
Number Puzzle
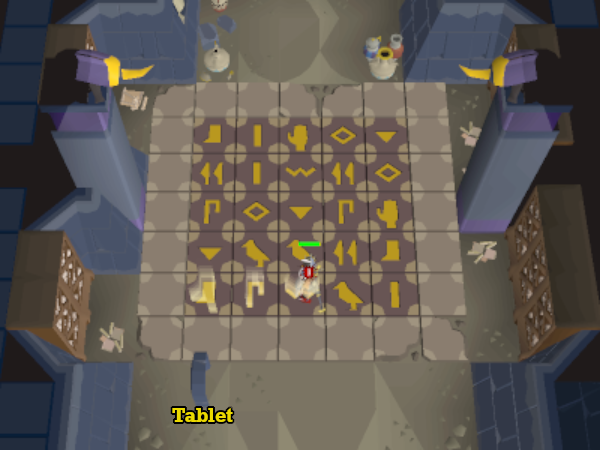
Left-click the tablet and you'll be given a random number between 20 and 45. Step on the tiles that add up to that number as shown in the solution below.
Light Puzzle
Left-click the button then memorize the tiles that light up and the order they light up in. Stand on all the highlighted tiles in the right order to complete the puzzle, then jump across to the final puzzle.
Shape Puzzle
You must activate the same shape on both boards but they are always in different positions. Check one board for the position of several shapes and memorize them, then find those same shapes on the other board. Click matching shapes on both boards one after the other — clicking the wrong shape on the second board resets the first one. Each time you match a shape correctly a tile will light up. Continue until all 9 tiles on both boards are lit to complete the puzzle.
I highly recommend using the Tombs of Amascut plugin to solve these puzzles. It makes it really easy and quick.
After solving the puzzle, click to enter the arena.
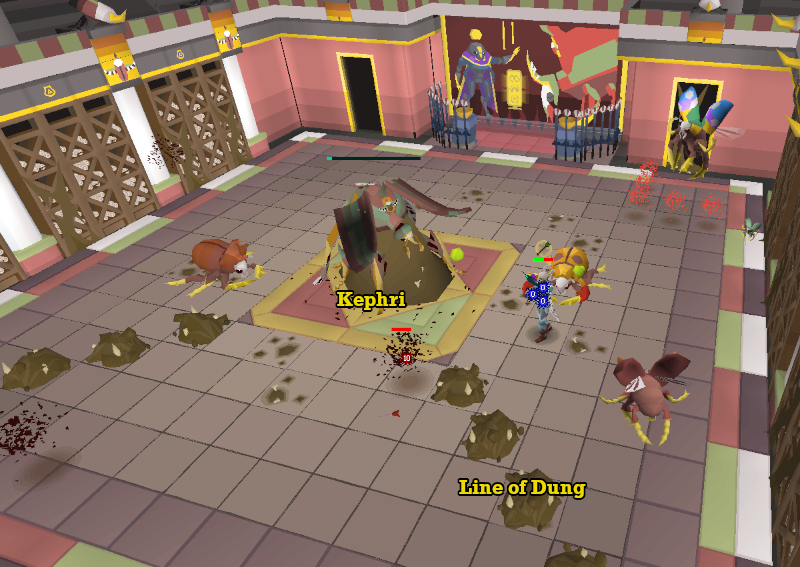
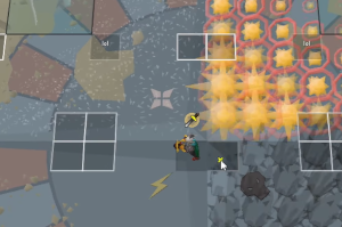
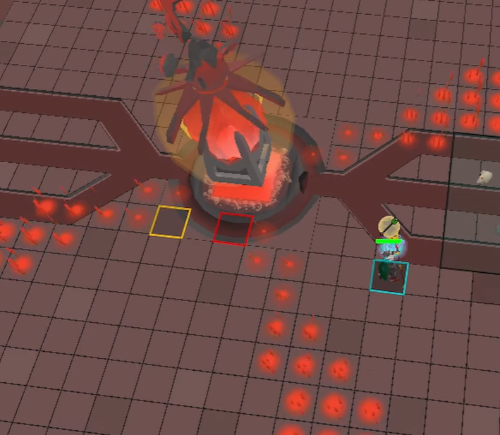
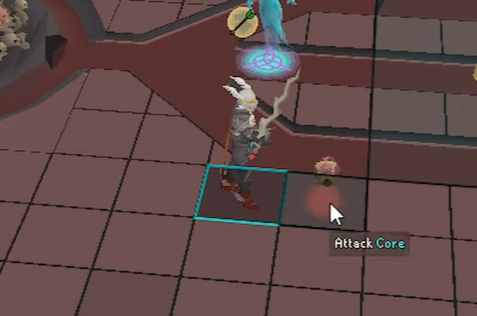
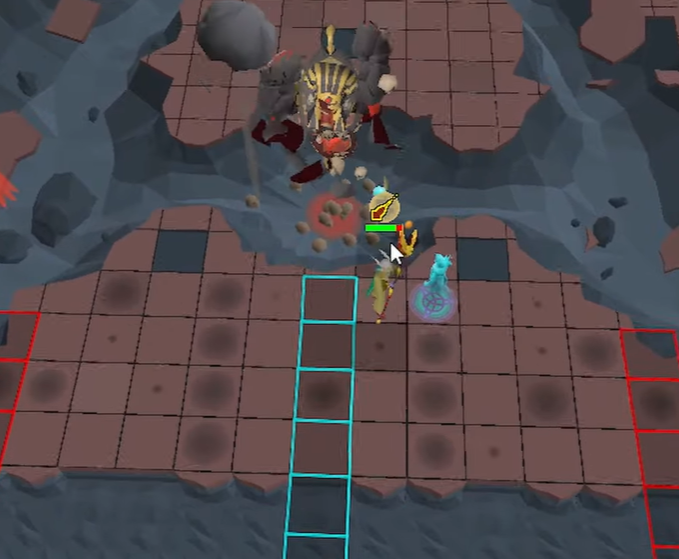
Kephri
Before entering, eat up if you took any damage from the Scarabas. Equip your melee gear, the Keris Partisan if you have it since Keris is weak to it, set to stab attack style and activate Piety.
Phase 1
Dump all your special attacks on Kephri straight away. No protection prayers are needed yet but watch out for these attacks:
- Fireball — Kephri launches this frequently. A shadow appears on the tile it will land on so just move off it to avoid damage
- Dung Strike — A circle of Scarabas will swirl over your head before this attack. Kephri knocks you back and sends a line of dung in your direction — move away after the knockback to avoid damage
- Mass Incubation — Kephri splatters eggs around the arena. Small light-coloured eggs and large dark-coloured eggs will both explode in a 3x3 area if left alone, and the large dark eggs will also hatch Agile Scarabs that attack with ranged. Take out the eggs before they explode.
Phase 2
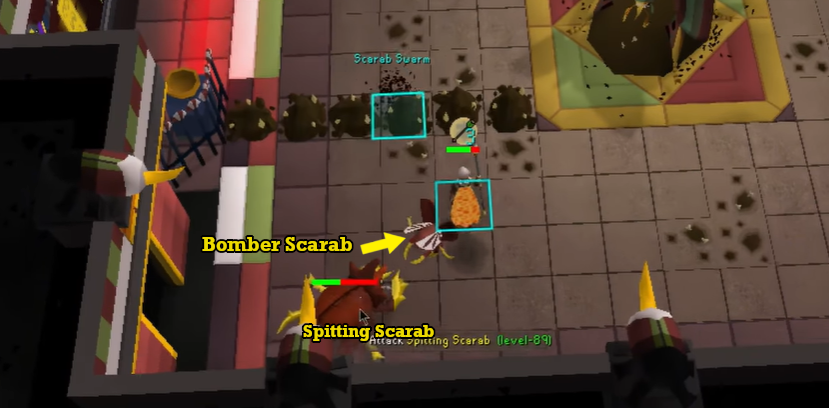
After taking Kephri down in phase 1, activate Protect from Ranged, switch to your ranged gear and attack the Scarab swarms that spawn. The Spitting Scarab in the corner will continuously hit you with ranged — ignore it for now and focus on killing as many Scarab swarms as possible before they reach Kephri.
Watch out for Bomber Scarabas being launched at you from the corners. The swarms will eventually reach Kephri and heal him, but try to take out as many as you can. With a Magic Shortbow, you should be able to stop most of them.
When Kephri heals up, switch to your melee weapon and attack the Spitting Scarab with Protect from Ranged still active, or it will start healing Kephri. When it's down, continue attacking Kephri, dodging its fireball attacks like before.
After a while, it will use another Dung Strike. Stand in the southwest corner when this attack comes, and don't get trapped inside. Dodge the Dung Strike by moving east to create a space that will trap the Soldier Scarab that spawns next.
Phase 3
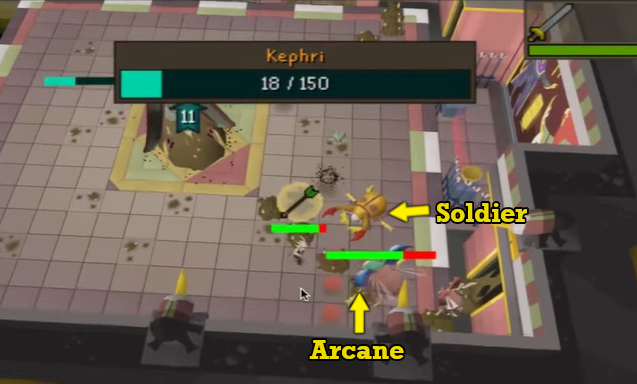
When Kephri's shield is down, the Soldier Scarab and Arcane Scarab will spawn. If you followed the method above, the Soldier Scarab should be not be able to reach as shown above. Kill the Arcane Scarab first with melee and Protect from Ranged active — take it down as fast as possible as it charges up and will hit you with a massive attack if fully charged.
Once the Arcane Scarab is down, switch to ranged gear and go back to killing the Scarab swarms. There will be a lot more now, so just focus on taking out as many as you can.
After Kephri heals up, switch to your best magic weapon and kill the trapped Soldier Scarab. Keep avoiding the fireballs while doing this. Once it's down, keep Protect from Ranged on and continue attacking Kephri while dodging fireballs until his final shield is down.
Final Phase
When the shield breaks for the third time, Kephri's true health bar is revealed. He will immediately hit you with the Dung Attack, so stay ready for the knockback. After that, the mechanics stay the same — keep Protect from Ranged on, dodge the fireballs, and keep attacking with melee until he's dead.
Helpful Spirit
After killing the second boss, the Helpful Spirit will appear in the Nexus with supplies. If you are low on food, choose Life otherwise, you can choose any of the other options you prefer.
Path of Het
Het has the most annoying puzzle in the raid. Your objective is to mine the Het Seal at the centre of the room, but first you need to direct light onto the statue on the east side of the seal by repositioning the mirrors around the room.
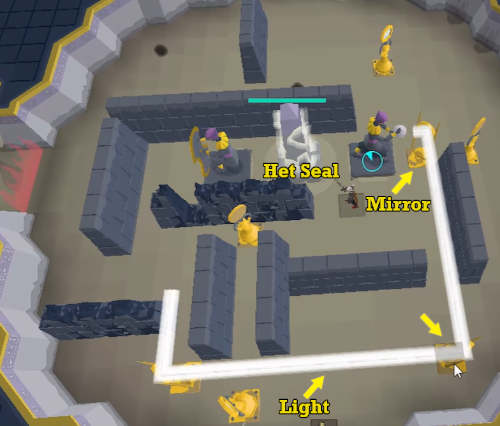
Push or pull the mirrors into position to reflect the light correctly, and avoid the orb of darkness moving around the room. Once the light hits the statue the room clears and you can mine the Het Seal. Use your best pickaxe as the damage you deal depends on it.
After 9 seconds the puzzle resets and you have to repeat the process until the seal's health is fully depleted. With a Dragon Pickaxe you should be able to finish this in 2 cycles. Use your pickaxe on the statue to the south to store it for future use.
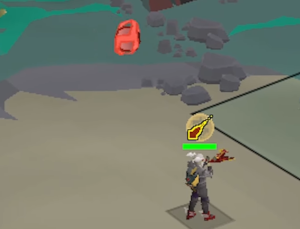
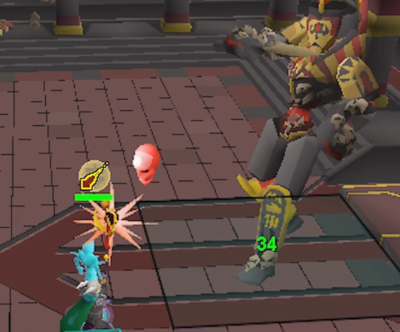
Akkha
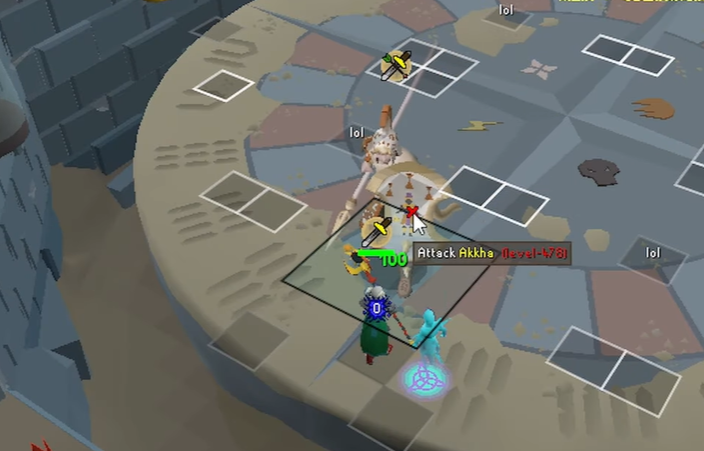
Before entering, equip your mage gear, pray Protect from Melee, and activate Mystic Might. We're starting with magic because Akkha opens by praying against melee and ranged, making him weak to magic, and will attack you with melee in return.
- If he prays Protect from Melee and Ranged — pray Protect from Melee and attack with magic
- If he prays Protect from Ranged and Magic — pray Protect from Ranged and attack with melee
- If he prays Protect from Magic and Melee — pray Protect from Magic and attack with ranged
He switches prayers very frequently throughout the fight so always watch his overhead prayer, attack with the correct style, and use the right protection prayer accordingly.
You also need to watch out for his special attacks:
- Memory Blast — The shapes close to the center on the floor will start to glow in a sequence, then bursts of energy will hit different sides of the arena. Stand in each quadrant in the exact order they glowed to avoid the bursts.
For example, if the shape in the North glows first, then South, then East — move to the North quadrant, then South, then East after each burst.
It's basically like a "Simon Says" game.
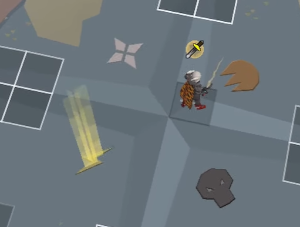
He will usually swap attack styles right after the Memory Blast, so look out for that as well.
- Shadows — Akkha summons shadows of himself around the room and becomes invulnerable until they are killed. Sometimes he does this alongside the Memory Blast — handle the Memory Blast first, then kill the shadows. They are weak to all combat styles, so use your highest DPS. After killing a shadow, you can only damage Akkha in the quadrant the shadow was in. If you don't kill the shadows fast enough and the hourglass empties, you'll take damage from a floor special attack.
- Trailing Orbs — Akkha turns you a darker colour and every step you take leaves behind dark orbs. Stepping on them deals damage
Enraged Phase
Once Akkha's health hits zero he will regenerate some health and become weak to melee only, so switch to your melee gear and start attacking.
He launches unstable orbs across the room and spawns at different spots, making it hard to navigate. Carefully move through the orbs to reach him each time. Use your spec weapon and activate Redemption, then focus on getting his health down as fast as possible before the orbs overwhelm you.
Path of Apmeken
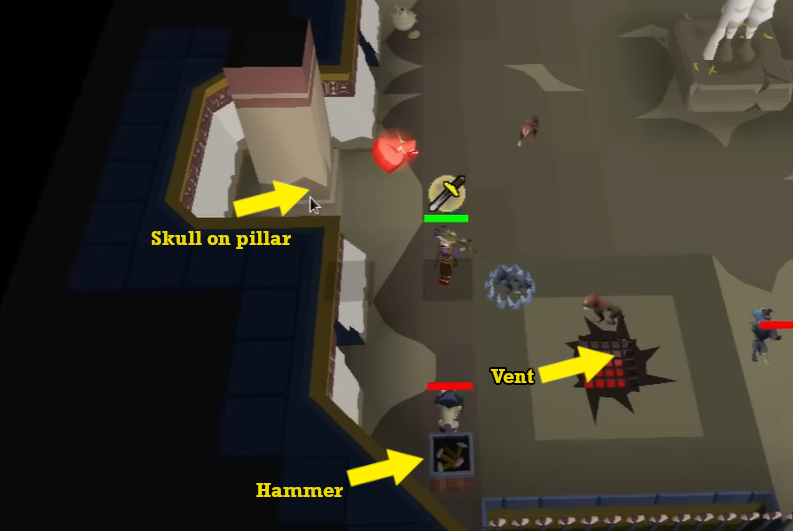
This path is less of a puzzle. You have to defeat all of Ba-Ba's pack while handling the events that occur in the room. All monsters die in one hit when attacked with their weakness.
First, pick up a hammer from the crates at the entrance, then equip mage gear with your best attacking spell before entering, since you'll be facing Baboon Brawlers first, who are weak to magic. Deal with each baboon accordingly, switching gear and protection prayers as needed. You can easily identify each baboon by their colour.
.png) Baboon Brawler (Weak to Magic) — Attacks with melee
Baboon Brawler (Weak to Magic) — Attacks with melee.png) Baboon Thrower (Weak to Melee) — Attacks with ranged
Baboon Thrower (Weak to Melee) — Attacks with ranged.png) Baboon Mage (Weak to Ranged) — Attacks with magic
Baboon Mage (Weak to Ranged) — Attacks with magic Baboon Shaman (Weak to Ranged) — Summons up to 4–5 Thralls. Take it down as quickly as possible before it spawns multiple thralls
 Baboon Thrall (Weak to Melee/Ranged/Magic) — Summoned by Shamans; drains prayer
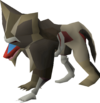 Volatile Baboon (Weak to Ranged/Magic) — Chases a player and explodes in a 3x3 AoE; attack with the correct style and move away immediately
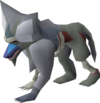 Cursed Baboon (Weak to Ranged/Magic) — Drops venom pools, dealing 6–8 damage per tick. Kill it quickly before it fills the arena with pools
You also need to respond to the Red Skull when it appears. If it appears on a vent, click the neutralizing potion while standing on the vent to remove it. If it appears on a roof support, click it to repair it with your hammer.
The monsters spawn in waves, which are the same every time, so you can always anticipate what's coming:
- Wave 1 — 2x Brawler, 1x Shaman
- Wave 2 — 2x Thrower, 1x Volatile
- Wave 3 — 2x Mage, 1x Cursed
- Wave 4 — 2x Thrower, 3x Special
- Wave 5 — 2x Mage, 1x Shaman, 2x Special
- Wave 6 — 2x Brawler, 1x Shaman, 2x Special
- Wave 7 — 1x Brawler, 1x Thrower, 1x Shaman, 2x Cursed
- Wave 8 — 1x Shaman, 2x Volatile, 2x Special
The Tombs of Amascut plugin is really helpful here as well since it highlights the colour of each monkey; making it easy to identify them.
Healing off the Baboons
Towards the end of the round, the weaker baboons will surround you. Use this opportunity to heal off them with Blood spells if you have them. Once all minions across all waves are dead, the puzzle is complete — click the door to enter the Ba-Ba arena.
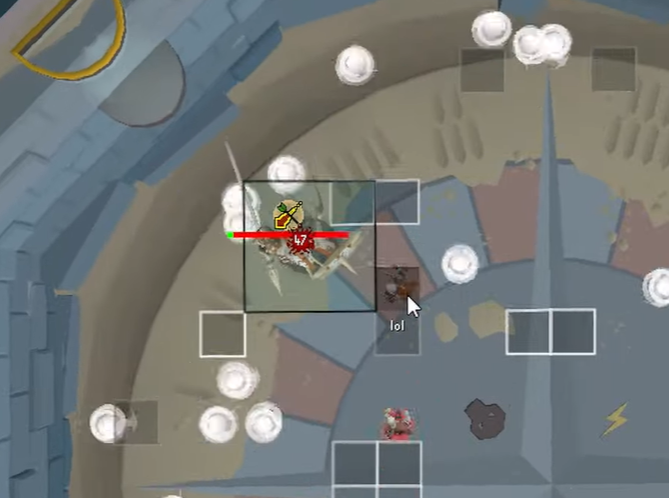
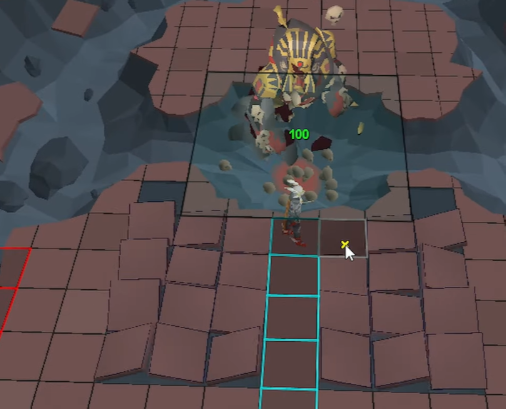
Ba-Ba, Guardian of Apmeken
Ba-Ba is a purely melee boss so equip your best melee gear before entering. Activate Piety and Protect from Melee, then head in and attack.
- Rockfall — Shadows appear on the floor before rocks land; just avoid those tiles
- Rock Throw — Ba-Ba will swipe her paw and boulders will fall on the arena. Always stand next to one of the debris piles in the arena. She will then throw a slow-moving rock at you — if you are not standing next to debris, you will take damage
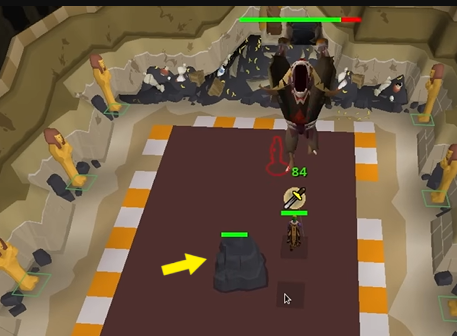
- Baboons — Ba-Ba will spawn Baboons at the side of the arena that will throw rocks at you. If you leave them, they will open the sarcophagus which will shoot fire at you, so take them down quickly.
- Rolling Boulders — At 66% and 33% health, Ba-Ba will push you across the room and send boulders rolling across the arena. Attack the damaged one to clear the path as shown below — with good ranged gear you can one-hit them.
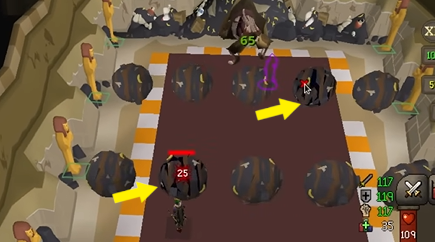
After a while the boulders stop and Ba-Ba goes back to attacking normally. Keep avoiding the shadow tiles, stay next to the debris before each rock throw, and watch out for the rolling boulders again at 33%. Maintain this until the fight is over. Once she's down, click the spot to proceed and return to the lobby.
Helpful Spirit
After killing the fourth boss, the Helpful Spirit will appear again in the Nexus with more supplies. I recommend choosing Life this time to stock up on healing potions. Drop your food if you need the inventory space for more potions. When you're ready, enter the portal for the final fight.
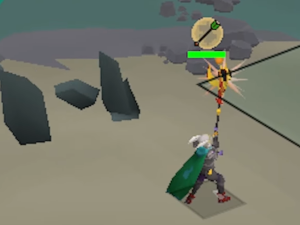
Final Fight
The final fight occurs in 3 phases. When ready to start, enter the arena, right-click Osmuten at the centre and select Begin.
Phase 1
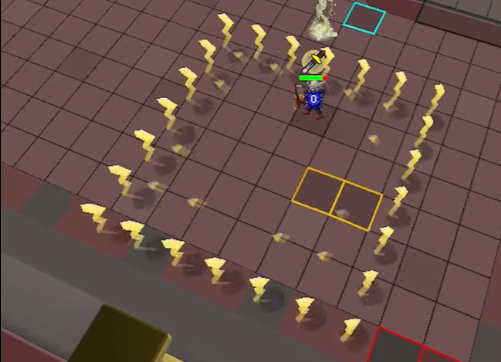
Your job in this phase is to attack the Obelisk in the middle of the room while avoiding the special attacks from the two Wardens on the sides. Stand on the side of the Obelisk to block the skulls from reaching and healing the Wardens.
Once you block the skulls, the Wardens will begin using their special attacks:
- UFOs — Small floating pyramids appear across the arena. Avoid the tiles directly under and diagonal to them. Immediately after the first set disappears another set appears in the opposite locations — dodge them the same way

- Charged Shots — Balls of energy that hit you directly. You can't dodge this solo so just take the hit and heal up
Continue attacking the Obelisk with melee while dodging these attacks until it's health is down.
Phase 2
Once the Obelisk is down, the Warden that received less charge from the Obelisk will crumble while the one with more charge attacks you. The east Warden starts weak to magic, and the west Warden starts weak to ranged. Attack based on what the Warden is not praying against, just like with Akkha, and switch protection prayers accordingly.
- Ranged — If he fires a rock at you, pray Protect from Ranged

- Magic — If he fires a skull at you, pray Protect from Magic
The Obelisk in the centre will also trigger special attacks, so keep moving around the arena to avoid them:
- Converging Beam — Two beams shoot north and south, then east and west, spreading out before converging back to the Obelisk
- Windmill Beam — Four beams shoot out clockwise like a windmill. The floor briefly glows before each beam fires
For the beams, just avoid any red or orange beams in the room to not the take damage
- Lightning Skull — Several red skulls are launched and discharge lightning in a 7x7 area where they land. Either run 5 tiles away from the shadow or stand 2 tiles north, east, west or south of it
Also, keep your distance from the Warden as it has a melee attack, and watch out for it turning off your prayer.
Once the Warden's shield is down it drops its core on the ground. Sip your Liquid Adrenaline, switch to melee gear, and dump your special attacks on it with your Dragon Dagger or any spec weapon you have.
After about four hits, the Warden will resurrect weak to the opposite style. Switch accordingly and continue attacking. Use Blood spells if the Warden is now weak to magic, as they will heal you.
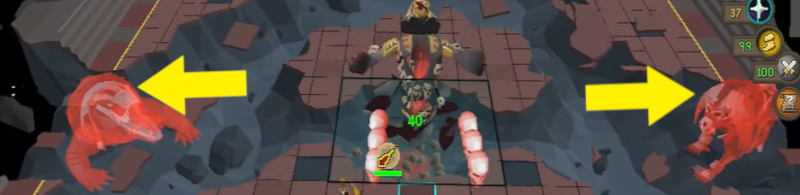
Phase 3
Switch to your ranged gear, activate your best ranged offensive prayer, and start attacking. No protection prayers needed yet.
The Warden's main attack in this phase is slamming the floor:
- He raises the right side — move left to dodge
- He raises the left side — move right to dodge
- He raises both sides — stand on the marked safe tile to avoid damage
- Skulls — At 80%, 60%, and 40% health, he shoots 4 skulls onto the floor. Quickly switch to melee and attack all 4 before they hit you. You can 1-tick them with a melee weapon so this is fast.
- Phantoms — After the second set of skulls, he spawns Phantoms. If facing Elidinis' Warden you'll get Akkha's Phantom and Kephri's Phantom. If facing Tumeken's Warden you'll get Zebak's Phantom and Ba-Ba's Phantom.
- Akkha's Phantom — Pray Protect from Ranged. When Akkha slams his spear into the ground, he is switching attack styles so swap to Protect from Magic
- Kephri's Phantom — Dodge the fireballs just like during the fight
- Zebak's Phantom — Pray Protect from Magic
- Ba-Ba's Phantom — Avoid the rocks
Enraged Phase
At 5% health, the Warden heals back to 25% and everything becomes faster and more chaotic. Shadows appear on tiles right before lightning strikes across the arena — avoid these while also dodging attacks from the Phantoms and praying correctly. Tiles will also start flying off the arena, dealing damage if you're standing on them.
Keep dodging and attacking until the Warden is finally down.
Congratulations! You have completed the Tombs of Amascut.
GP per Hour from TOA
Tombs of Amascut is quite profitable, with earnings depending on your gear and raid level. The main unique drops are the Masori Armour set, Osmumten's Fang, Elidinis' Ward, and Tumeken's Shadow.
- Expert level — roughly 4.1M GP per hour
- Solo at 450 raid level — roughly 7M GP per hour
- Solo at 545 raid level — roughly 9M GP per hour
Conclusion
That's everything you need to know to get through the Tombs of Amascut. It may feel overwhelming at first but once you get a few runs under your belt the mechanics become second nature. Start without any invocations, get comfortable with each boss and puzzle, then gradually add invocations as your confidence grows. The loot is worth it and with enough practice this raid becomes one of the most enjoyable in the game. Good luck.